
Light leak overlays are one of the fastest ways to add atmosphere, movement, and polish to your edits in Adobe Premiere Pro. With just a few clicks, you can turn a boring straight cut into something cinematic and eye-catching.
In this tutorial, I’ll show you how to use light leak overlays as a transition in Premiere Pro, plus a few extra creative ideas at the end.
So you can follow along step by step, grab our pack of free light leaks and place them on your Desktop.
Download our free bokeh light leak overlays for Premiere Pro →
Watch the Tutorial Video

Step 1: Download the Free Light Leak Overlays
Before we start, grab the free bokeh light leak pack linked below. These clips work in Premiere Pro with no plugins required.
What’s included:
- 20 elegant bokeh light leak clips
- High resolution (horizontal or vertical)
- Drag-and-drop workflow
Download the free Premiere Pro light leak overlays →
Step 2: Set Up Your Cut in Premiere Pro
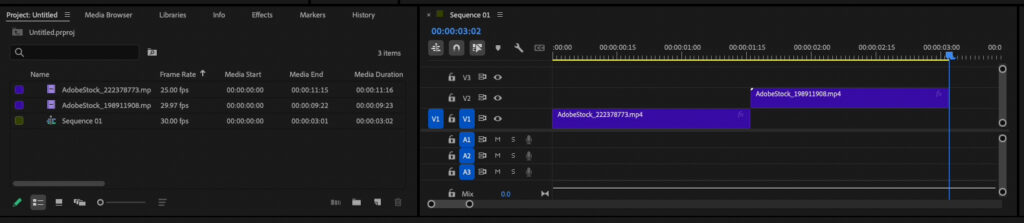
Start with two clips on your timeline with a simple straight cut between them.
This is exactly the kind of edit where light leaks work best — they add motion and energy without needing complex transitions.
Step 3: Add the Light Leak Overlay
There are a couple of easy ways to bring your light leak clips into Premiere Pro:
- Drag a clip directly from your Desktop onto the timeline
- Or import multiple clips into the Project panel, then drag one onto the timeline
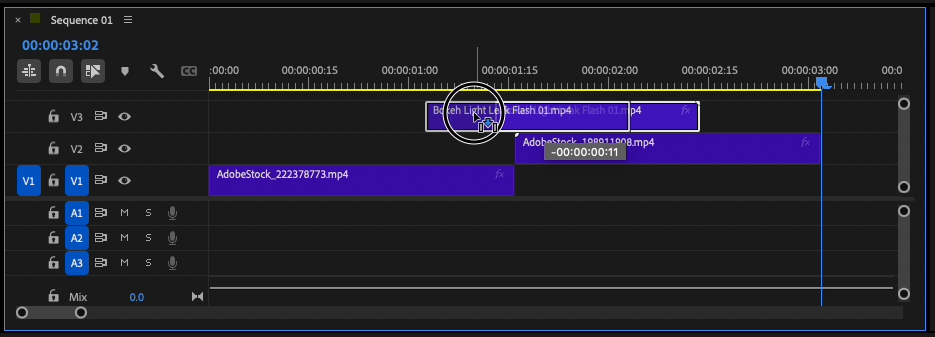
Place the light leak clip on a video layer above your cut.
Make sure the clip straddles both clips underneath so it works as a transition.
Step 4: Adjust the Speed (Optional)
If the light leak feels too fast or too slow:
- Right-click the light leak clip
- Choose Speed / Duration
- Adjust the percentage
- Lower percentage = slower playback
- Higher percentage = faster playback
This lets you fine-tune the timing so the transition feels natural.
Step 5: Change the Blend Mode to Remove Black
Most light leak overlays come with a black background — this is intentional.
To make the black areas transparent:
- Select the light leak clip
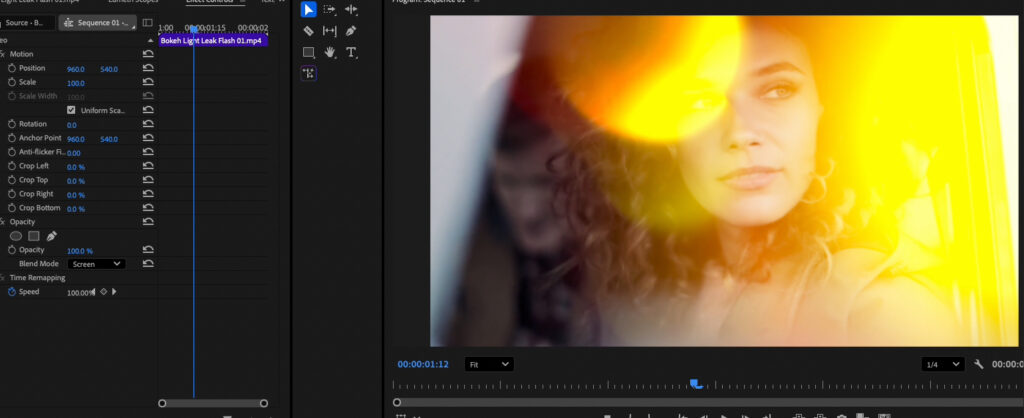
- Go to the Effect Controls panel
- Open Opacity
- Change Blend Mode to Screen
The black disappears instantly, leaving only the bright light leak effect.

That’s it — instant beauty.
Creative Uses for Light Leak Overlays
Light leaks aren’t just for transitions.
Try these ideas:
Add a Glow Over Your Footage
Place a light leak clip over your footage (not just on a cut) for:
- A dreamy or spiritual glow
- Warm highlights
- Subtle motion in static shots
Lower the clip opacity if the effect feels too strong.
Try Different Blend Modes
While Screen works best in most cases, you can experiment with others.
For more intensity, try:
- Linear Dodge (Add)
This works especially well for bright, punchy light effects.
Use the Same Trick with Other Overlays
The blend mode method works with any footage that has a black background, including:
- Glitch overlays
- Dust and film grain
- Rain, snow, or weather effects
- Even other video clips for a double-exposure look
Once you understand blend modes, a lot of creative options open up.
Want More Light Leaks?
If you like the free pack, check out our amazing CINEBURNS VFX overlay pack, which includes:
- 800+ film burns and light leaks
- 4K resolution clips
- Instant drag-and-drop functionality
- A wide range of styles

Perfect for music videos, social media content, commercials, and cinematic edits.
Check out the CINEBURNS VFX overlay pack →
Final Thoughts
Light leak overlays are one of the simplest ways to level up your Premiere Pro edits. No plugins, no complex effects — just drag, blend, and go.
If you found this helpful:
- Subscribe on YouTube for more video effects tutorials
- Download the free pack and experiment
- Try combining light leaks with other overlays for unique results
Happy editing 🎬
FAQs
Screen is the most commonly used blend mode for light leak overlays because it removes black backgrounds while keeping the bright highlights. For stronger effects, try Linear Dodge (Add) for more intensity.
Light leak overlays should be placed on a video track above your main footage. When using them as transitions, make sure the overlay overlaps both clips on either side of the cut.
Yes. You can adjust the intensity by changing the clip’s opacity, blend mode, speed, or by trimming and repositioning the overlay on the timeline.
No plugins are required. Light leak overlays work natively in Premiere Pro using built-in blend modes and standard video layers.
Yes. Light leak overlays can be used over entire shots to add atmosphere, warmth, motion, or a subtle glow, not just as transitions between clips.